Most people using GENIE will wish to do three things.
These are described separately in the following sections, but first, here is a simple example of doing all three so that you can get a feel for using Open GENIE commands
This is a very simple GENIE session to access some time of flight data collected on the HRPD instrument. A background is subtracted and the result displayed.
$ genie
Open GENIE V1.0 BUILD-23 [Linked] Thu Jan  2 15:26:39 GMT 1997 [library version] 1.0
(Running on alpha:OSF1:V4.0 (built with DEC C++ V5.3))
>>
(note: On some VMS systems running the older GENIE-V2 program, the command to start Open GENIE is set to be "opengenie" instead of "genie").
Now that GENIE is running, most people will set up some defaults to allow easy access to files in the data area of the instrument they are using. If you always use one instrument, these defaults can be set up in a command file to be run automatically when GENIE starts (See
>> set/disk "hrpd$disk0:"
Default disk: iris$disk0:
>> set/instrument "hrp"
Default instrument: hrp
>> set/directory "[hrpmgr.data]"
Default directory: [hrpmgr.data]
>> set/extension "raw"
Default filename extension: .raw
From this point it is possible to select any raw dataset using the Assign command followed by the run number.
>> assign 8639
Default input file: hrpd$disk0:[hrpmgr.data]hrp08639.raw
On UNIX, the commands for setting defaults are similar and use the appropriate syntax for Unix file names.
>> set/instrument "hrp"
Default instrument: hrp
>> set/directory "/vax/iris0/hrpmgr/data/"
Default directory: [hrpmgr.data]
>> set/extension "raw"
Default filename extension: .raw
(no Set/Disk command is required). Note that on both operating systems it is essential to put string arguments like filenames in double quotes.
Now that the source for the data has been selected it is possible to access individual spectra from the dataset for manipulation and display. This is done using the Spectrum function. This is normally abbreviated to "s."
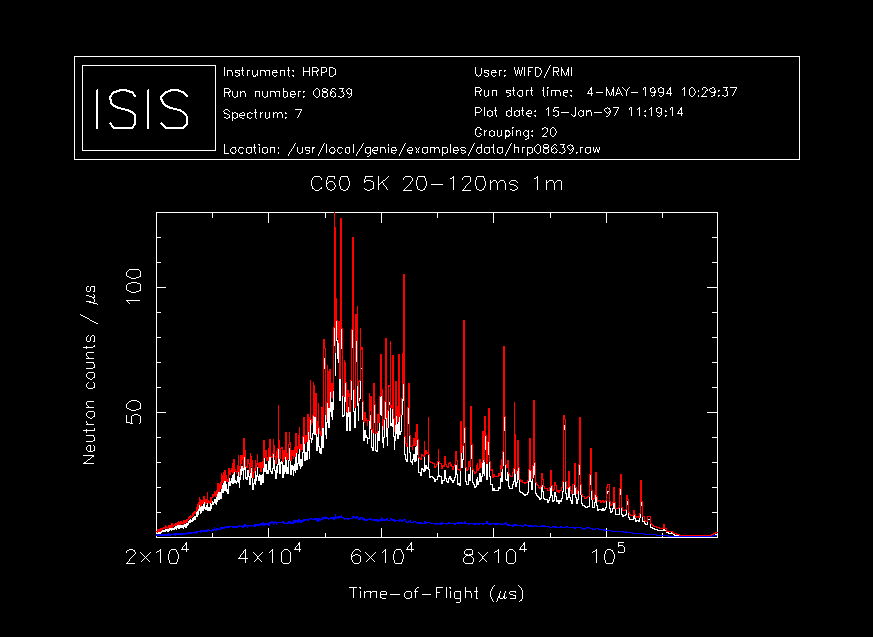
>> w = s(7)
Reading spectrum 1 from iris$disk0:[irsmgr.data]irs08202.RAW
>> background = s(1)
Reading spectrum 1 from iris$disk0:[irsmgr.data]irs08202.RAW
>> corrected = w - background
Here the seventh spectrum is read into a workspace called w. The first spectrum in the file is subtracted from the spectrum in w and the result is put into another workspace called corrected. Workspaces are created whenever a spectrum is assigned to them and their names are arbitrary. The corrected spectrum can now be displayed using the Display command.
>> display corrected
  Opening graphics device XW
Displayed using bin-grouping of 10
We can also plot the two original spectra on the same plot but using different colours to show them up clearly
>> alter/plotcolour $blue
>> plot background
 Plotted using bin-grouping of 10
>> alter/plotcolour $red
>> plot w
 Plotted using bin-grouping of 10
The plot produced is shown below.
This brief example should have given you a good idea what an Open GENIE session looks like and a mental framework into which the more detailed information in the next three sections will fit. The data file plotted here is available in the ".../genie/examples/data" directory so by changing the file locations in the example above, you should be able to reproduce this plot for yourself.